Contact: John Foltz - john.foltz@usa.net

Front Fairing #4
This fairing uses a new framing material for me: round aluminum tubing.
The goals I had for this fairing were: 1. lighter weight 2.
narrower profile 3. Windshield unimpeded by frame 4.
better, more stable mounting. I started out by making the main framing
pieces. Instead of PVC or square aluminum tubing, I went with round stuff
and copper fittings.
As you can see, I used copper tees as lugs. The 7/8" bright aluminum
tubing fit snugly inside the 3/4" copper, and was glued to form strong
joints. On the ends, I attached some aluminum bar, drilled and formed.
This arrangement worked, but was subsequently replaced with larger pieces
which could be attached with two pop rivets each, vice the one each as
shown. Attachment of the Coroplast was with a single zip tie through
the hole at each mounting point. By using 30-lb zip ties, the frame sort
of floats on the frame and has enough flexibility and strength that I can
fold the frame down inside the fairing for transport. Here is what each
piece looked like:

|
|
|
Glued frame assembly
|
Closeup of coroplast mounting point
|
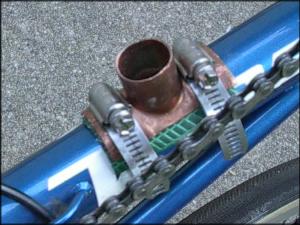
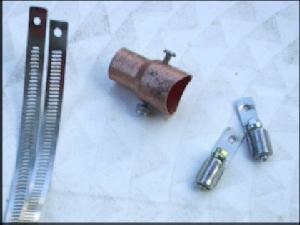
The top mount for the bike is made from a 3/4" copper tee. I had to
flatten the open side to fit against the main tube The front mount was
made from a 1 to 3/4" reducer, shown before assembly. As in other fairings,
I protected the paint with pieces of garden hose.
|
|
|
Top mount installed on bike
|
Unassembled pieces for front mount
|
After mounting the frame on the bike, the next step was to run a hoop
around the perimeter of the fairing body. I did this to define the shape
of the fairing. In place of my traditional 4mm yellow coroplast, here I
am using 3mm 'natural' coroplast. I taped a hoop to the top to help
define the 'blow' at the top, and to help position the next, center strip.
The center strip was not intended to remain in place, it was merely to
define the center edges of the adjacent strips. With the adjacent pieces
cut, I removed the center piece and butted the two adjacent pieces together,
forming the 'keel' of the fairing. I then added more strips to fill out
the rest of the body.
|
|
|
Perimeter strip
|
Two pairs of strips installed
(ignore the tape along the center seam.)
|
As in past fairings, finish work involves adding a windshield, and taping
edges and seams. And Voila! New fairing! Total time, about an hour one
evening making the frame, and about two hours the next evening building
the fairing itself.
|

|
|
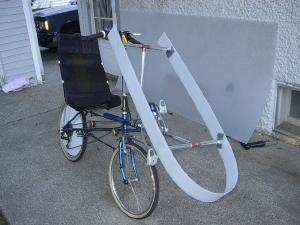
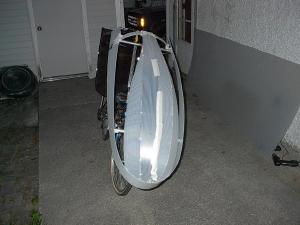
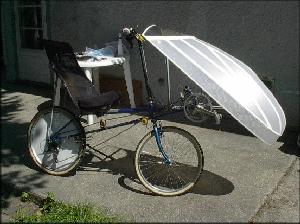
Side view, finished fairing
|
Front view, finished fairing
|
Here it is, exactly as ridden on DALMAC 2001. I didn't get the curves
quite right, as you can see by the side view, but easily fixed; this fairing
as shown used about a third of a sheet of Coroplast. The perimeter strip
allowed the profile to be narrower and better-defined than my previous
fairings, which suffered, to varying degrees, from the 'billow' effect.
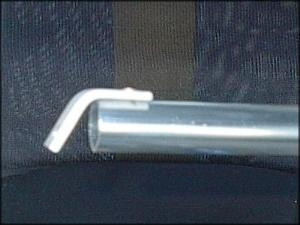
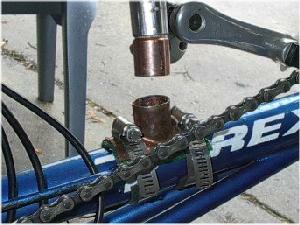
The road tests revealed a few weaknesses. First, the hard copper mounts
cut into the soft aluminum tubing, causing rattles. The solution is shown,
below left. The 1/2" to 3/4" adapter had some slop inside the aluminum,
but the glue I used expanded to fill the gap as it hardened, making a nice
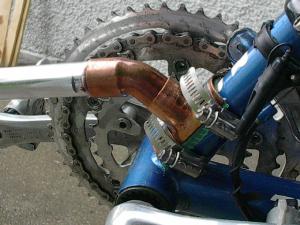
tight bond. Second, the front mount kept slipping down under the weight
of the fairing. Below right, attaching it to the shift tube wasn't quite
as elegant, but it doesn't slip anymore. The 45 degree street elbow is
glued to the aluminum and inserts into the tee so snugly I haven't needed
to pin it.
|
|
|
New copper end piece for upper frame
|
New front end mount
|
As an aside, although I don't have a Flip-It stem, this frame would
allow a Flip-It to pivot forward further than my previous fairing frames.
I finally compared weights between this fairing with my front fairing
#3, and it is noticeably lighter; more so than I originally thought it
would be. I plan on painting the frame this winter to make it match the
bike better. For now, I'm too busy riding.
My Projects